
Professionally designed for 3.5" x 8.5" flyers. Fully editable & free!
Homeowners compare crews based on clarity, durability, and local presence. A clean flyer explains your siding services, shows a simple estimate path, and reinforces trust with before/after visuals.
The compact 3.5x8.5 custom flyers format fits door-to-door routes and counter stacks without crowding text.
Use siding installation flyers to reach neighbors after recent storms or remodels and direct them to a short estimate form.
Printed on 18pt Ultra Premium Pearl, these paper flyers hold up in transport and stay crisp in displays.
Lead with one core promise: clean installs, tight timelines, and honest pricing. Keep the offer simple—“free estimate” or “storm-damage assessment”—and place the CTA near your service list.
List two or three siding materials you install and a short warranty note. Use high-contrast blocks so contact lines remain readable at arm’s length.


Homeowners skim for clarity. Show materials, warranty, and a low-friction estimate CTA.
Short, direct copy helps crews book inspections quickly.
3.5x8.5 marketing handouts fit glove boxes, door drops, and counter stacks without folding.
The size keeps material lists readable while leaving space for a bold CTA.
Use top for the service promise, middle for materials and warranty, bottom for contact and QR.
As 3.5x8.5 siding installation flyers, the format stays legible in vertical racks and on counters.
Field-ready pieces need durability. Premium quality prints on 18pt Ultra Premium Pearl resist scuffing and keep corners crisp.
High-contrast panels protect paper flyers readability on jobsite boards.
When copy is minimal, the finish elevates the professional feel.
Use one short offer: “Free estimate within 48 hours” or “Storm-damage assessment today.”
Keep terms on the website so the flyer remains focused and easy to scan.
Focus routes around neighborhoods with recent exterior updates or weather events.
Pair door-to-door drops with hardware store counters, HOA boards, and partner showrooms.
Consistent placements keep siding installation handouts visible when homeowners start bids.
Include one line per material and a warranty length note.
Move detailed specs to the estimate page so this piece stays readable.
Clean edges and true color panels signal professional work. Premium quality prints reinforce trust and protect legibility in small formats.
When the piece looks solid, crews feel more credible at the doorstep.
Use one QR that lands on a short form with address, material interest, and preferred time.
Track scans by route to prioritize the highest-response neighborhoods.
Explain steps briefly: measurement, material selection, scheduling, install, cleanup, and walkthrough.
Clarity reduces friction and sets expectations before the estimate.
Vinyl, fiber cement, and engineered wood each serve different needs.
Use one line per material and connect to warranty and maintenance notes.
House wrap and insulation improve comfort and energy bills.
Include a short note on air and moisture control, tied to warranty terms.
Offer help documenting damage and providing estimates for claims.
Keep the CTA focused on fast assessments and clear next steps.
Note HOA approval steps and local permit compliance.
Use a single line that reassures homeowners about rules and timelines.
Explain how related exterior components integrate with siding work.
Use short lines to show complete exterior service readiness.
Offer swatches and color matching, and a brief consultation.
Guide homeowners to a choice that fits neighborhood standards.
Set expectations for measurements and quote delivery timelines.
Keep the quote path simple and the CTA visible.
If financing exists, mention it in one line.
Use offer testing to find the best response without heavy copy.
Share typical install windows and contingencies for weather.
Short notes reduce anxiety and improve readiness to book.
License, insurance, and training build trust.
Use one line highlighting crew standards and on-site safety.
Include a lead-safe note for older homes, if applicable.
Reassurance improves confidence for historic properties.
Visual proof and references support decisions.
Use small thumbnails or point to an online gallery via QR.
List core service areas in one line.
Local presence increases trust and reduces travel concerns.
Explain weather policies and rescheduling flexibility.
Clarity reduces postponement stress.
Promise tidy cleanup and responsible disposal.
Short notes on haul-away and recycling build confidence.
Peak interest often follows storms and pre-summer remodels.
Plan runs around seasonal needs for stronger response.
For early route tests, cheap siding installation flyers maintain coverage without heavy spend.
Match flyer headline and offer to the estimate page.
Consistency with digital channels prevents confusion.
Alignment across siding installation marketing materials and print keeps the message consistent.
Test two offer lines with the same layout.
Track scans by placement, then scale the winner.
Use bulk orders for partner counters and showrooms.
Keep visuals consistent and the CTA identical.
Keep routes tight and repeat before expanding.
Use the same headline and track results with distinct QR destinations.
Assess sheathing, framing, and moisture intrusion before installing new siding. Document soft spots, rot, or uneven surfaces and propose repair steps in the estimate.
A clean, flat substrate improves panel alignment, fastener bite, and long-term appearance.
Integrate house wrap, window/door flashing, and kickout flashing to keep water out of the assembly.
Short notes help homeowners understand why proper flashing protects warranties and reduces future service calls.
Explain recommended fastener types and spacing for each material. Proper nailing patterns protect aesthetics and performance.
Brief guidance reassures homeowners the install follows manufacturer specs and local code.
Use compatible sealants at joints, penetrations, and trim transitions. Caulk selection matters for UV exposure and movement.
Set expectations about touch-up at the final walkthrough so seams look clean and weather-ready.
Show how soffit vents, rainscreens, and proper clearances help walls dry. Moisture management reduces paint failure and siding movement.
Short explanations make the value of these details clear without heavy technical copy.
Older homes may need lead-safe handling, custom trim profiles, and careful substrate repair.
One reassurance line signals respect for historic details and code requirements.
Outline additional fastening, corrosion-resistant trim, and sealed transitions for coastal or high-wind zones.
Brief notes show readiness for stricter local conditions.
Include small guidance about expansion allowances, laps, and end gaps. Movement planning prevents buckling and joint failure.
One sentence makes the concept clear without overloading the flyer.
Describe jobsite handling, storage off the ground, and weather protection. Clean handling preserves finish and reduces waste.
Short notes demonstrate professional staging and care.
Explain saw types, blades, and edge treatment for fiber cement or engineered wood. Clean cuts improve fit and paint adhesion.
Confidence grows when homeowners understand the craftsmanship behind the look.
Note manufacturer fade ratings, darker color behavior, and maintenance tips.
Setting expectations prevents surprises and supports long-term satisfaction.
Offer a simple checklist—gentle washing, caulk inspection, and touch-up paint cadence.
Clear maintenance keeps curb appeal and warranty strength over time.
Summarize registration steps and what photos/documents you provide post-install.
Documentation reduces support friction and protects homeowner investment.
Explain how scope changes, color swaps, or trim upgrades are confirmed and priced.
A transparent process minimizes delays and keeps the project on track.
Describe how crews handle touch-ups and finish lines. The final walkthrough aligns expectations and confirms satisfaction.
This step builds trust and reduces callbacks.
Short notes about haul-away, sorting, and recycling show environmental care and tidy jobsite discipline.
Neighbors notice good cleanup habits, improving referral potential.
Crews coordinate parking, noise windows, and property protection with neighbors.
Courteous site etiquette makes the project smoother and supports stronger referrals.
Explain how starter strips set the first course level, how J-channels finish edges around windows and doors, and how corner posts ensure clean transitions.
Short notes show attention to detail that homeowners notice from the curb.
Demonstrate proper trim, flashing, and sealant at openings. Tight integration prevents water intrusion and maintains aesthetic lines.
Set expectations for touch-ups and final caulk review at the walkthrough.
Outline how a ventilated rainscreen improves drying and prevents trapped moisture. Explain clearances at transitions and penetrations.
Brief guidance clarifies why this detail protects paint and siding life.
Describe factory finish options versus field-painted edges. Use compatible paint systems for touch-up to maintain sheen and color consistency.
Clean edges and correct touch-up raise perceived quality.
Provide maintenance cadence, gentle washing, and periodic inspections for joints and caulk. Outline color stability notes.
One simple checklist improves long-term curb appeal.
Show how slots and fastener placement allow movement. Emphasize not overdriving nails and keeping panels free to float.
Movement planning prevents ripples and buckling across seasons.
Explain how soffit vents, fascia lines, and drip edges coordinate with siding courses.
Consistent alignment makes the whole exterior feel intentional and premium.
Short notes about recycling, responsible disposal, and optimized cuts reduce waste.
Environmental care and tidy staging improve referrals and neighbor sentiment.
Keep routes tight around recent remodels or storm paths. Repeat every two to three weeks and use the same headline so recognition builds.
Pair the main loop with two supporting placements—hardware counters and HOA boards. Use one QR per channel so results stay measurable.
Reliable local siding installation flyers printing supports consistent turnaround for restocks.
Test two CTAs with identical layouts and track scans by placement. Scale the winner with controlled spend.
Consistent visuals build recognition while you refine messaging without redesign cycles.
Keep the estimate form short—address, material interest, and preferred window. Use clear headings and mobile-first spacing.
Visible trust lines and local references improve conversion at the doorstep.
Assign distinct QR destinations per route and placement type. Weekly exports reveal high-response streets and boards without complex tooling.
Scale the best routes and pause weak loops to keep spend efficient.
Train crews to leave two flyers—one for the homeowner and one for the fridge or file. Provide a simple script: headline, materials, warranty, CTA.
Consistent delivery builds brand familiarity and encourages referrals.
Upload artwork for custom siding installation flyers with a clear CTA and durable stock.
See how a QR code bridges print and digital. Use one destination per route to measure response without complex software.
Keep the code large for quick scans at the doorstep and verify the landing page loads fast on mobile.
Proofing checks contrast, trimming, and spacing so service lines and the CTA remain clear.
We also verify the QR destination and contact lines so siding installation flyers work without errors.
Confirm that the estimate form loads quickly on mobile for doorstep scans.
Review bleed and gutter spacing around tight trim imagery—uneven crops signal sloppy work. Keep headline contrast above accessibility thresholds to protect clarity in poor lighting near doorways.
Prefer fewer fonts and consistent weights. Matte finishes reduce glare near siding courses and often improve photo legibility.
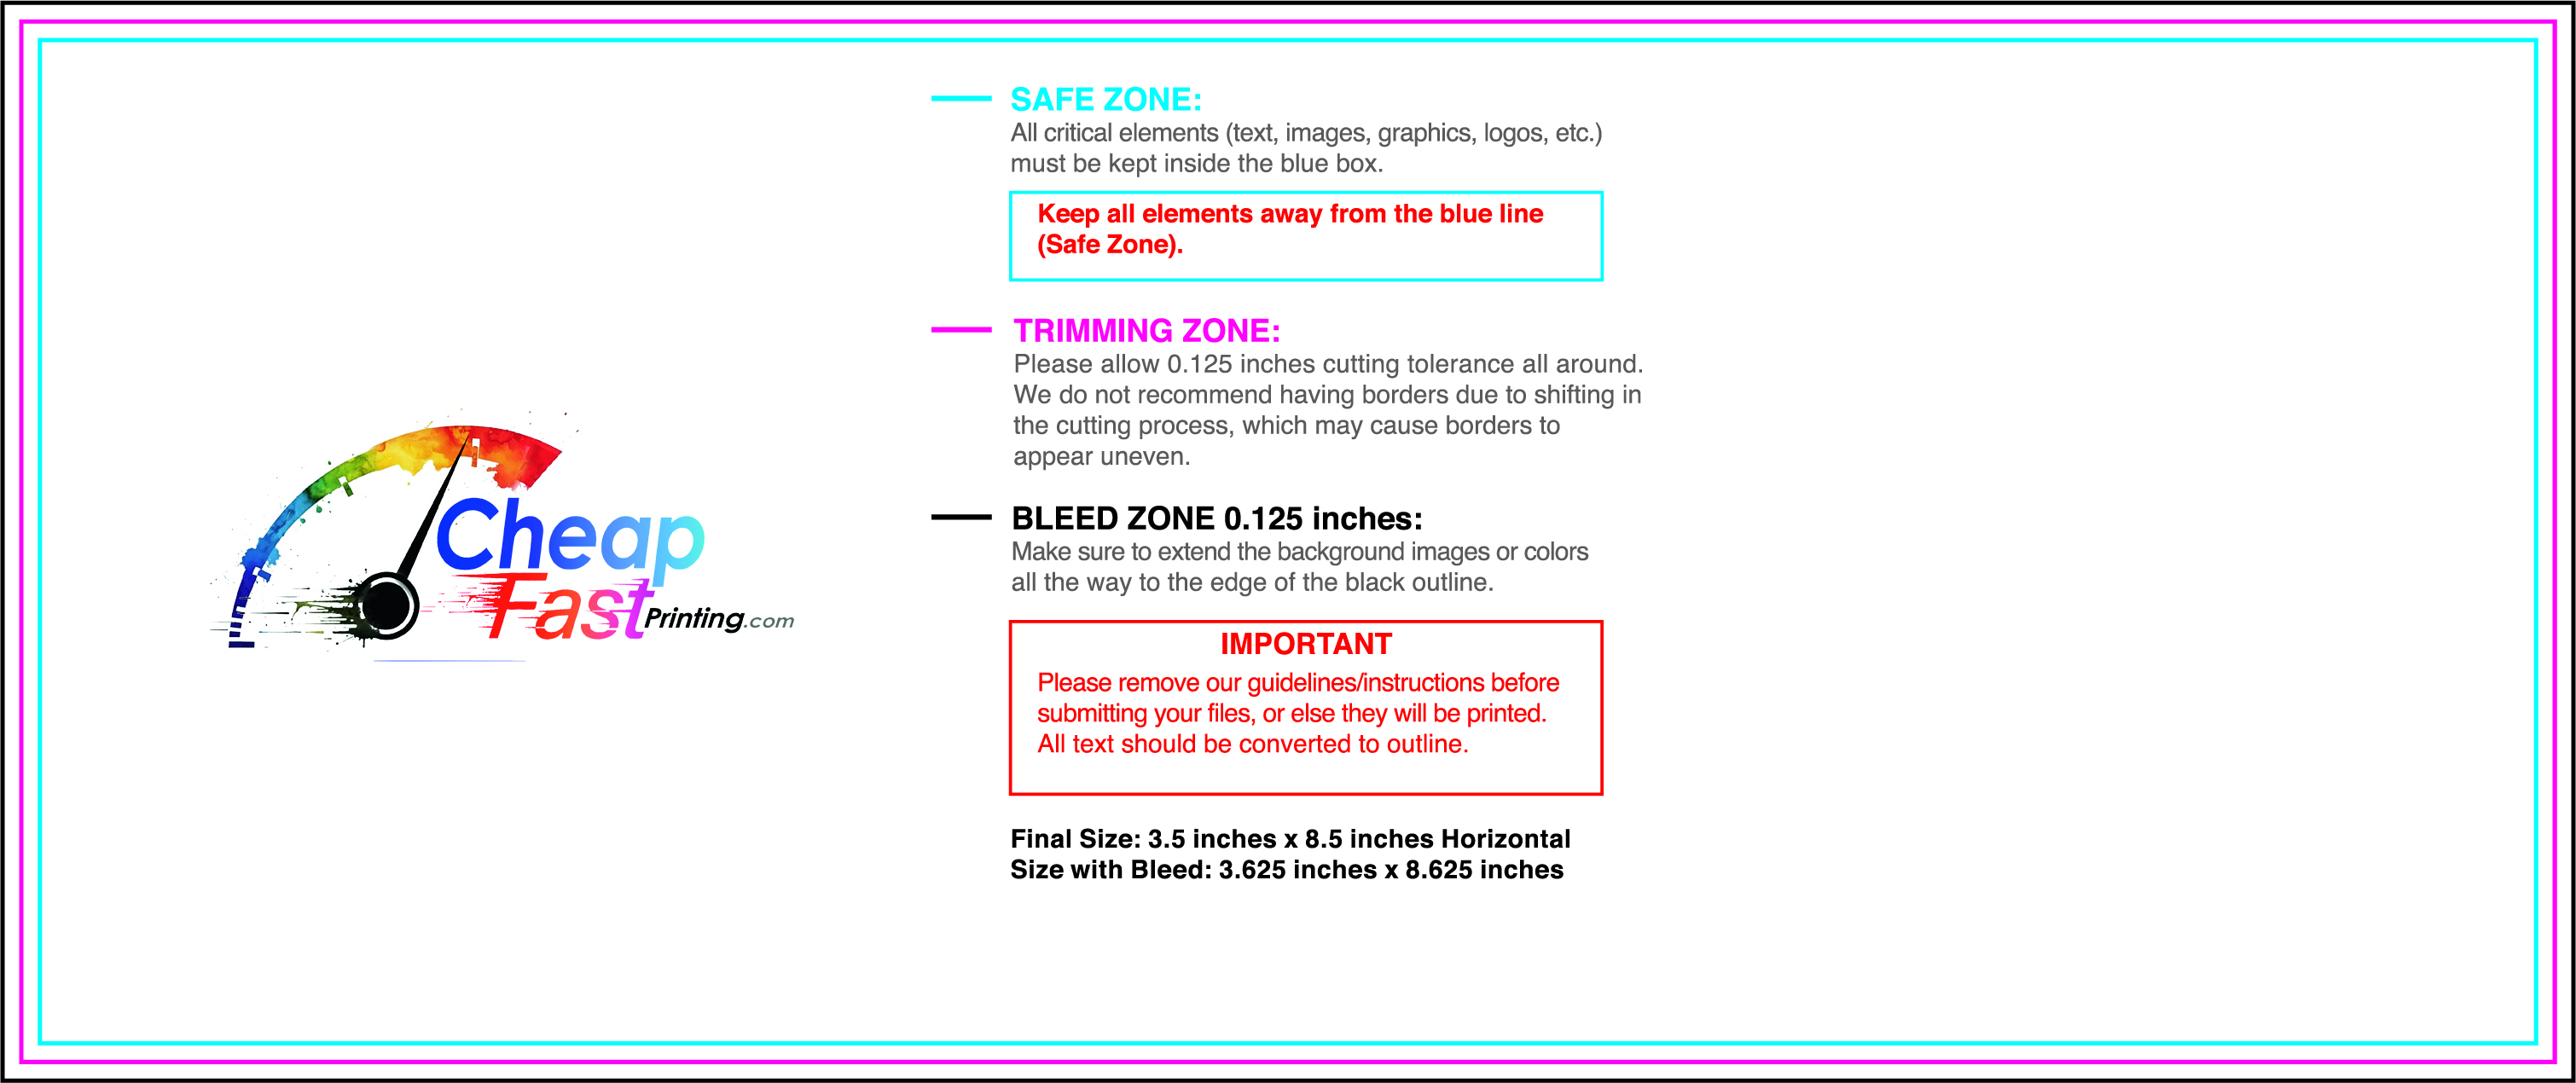
Use the 3.5x8.5 siding installation flyer template to keep margins consistent and reserve space for a bold CTA and service list.
Templates protect alignment for QR placement, phone lines, and warranty notes so the piece reads cleanly after trimming.
Lock safe zones and gutters to prevent edge crowding on small formats.
Provide art at 300 DPI with 0.125" bleed and verify contrast ratios for legibility at arm’s length.
A stable layout helps staff update offers without redesigns and supports multi-route prints with minimal editing.

Loading Free Editable Designs...
Please wait while we prepare the template library.
Choose stock and finish that survive field use. 18pt Ultra Premium Pearl protects corners and keeps service lines crisp.
Test one offer and scale the winner with controlled spend. Clear, durable prints deliver better inquiries than bargain runs.
Use cost control wisely while preserving legibility and trust.
Readable paper flyers with a consistent CTA deliver stronger estimates than the cheapest prints with crowded copy.
Compare by QR scans, booked estimates, and close rate rather than ink cost alone.
Use one clear headline, one offer, and one primary CTA (call, scan, or order). Add the essentials: phone, website/QR, service area, hours (if relevant), and a trust signal like years in business or a short review snippet.
Keep the layout scannable: one hero image or icon, short bullets, and high-contrast CTA text that’s readable at arm’s length.
Yes. 3.5" x 8.5" balances visibility and readability without feeling cramped. It gives enough space for a strong headline, a benefits list, and a CTA while staying easy to hand out or place on counters and boards.
Prioritize spacing and hierarchy over extra copy so the main message lands in 3–5 seconds.
18 pt. Ultra Premium Pearl with Gloss affects how the flyer feels and how colors read. Gloss tends to boost color and photos, matte reduces glare and feels more premium for text-heavy layouts, and uncoated is great for writing on.
If your design uses lots of fine text, choose clarity and contrast first; paper upgrades won’t fix a crowded layout.
2500 works well when you want consistent visibility across multiple placements (counters, boards, partner locations, events) over a few weeks. Bulk also lowers unit cost so you can test a message and keep the winner running.
Track performance, then reprint the best offer instead of changing everything at once.
If price is your main hook, feature one simple offer (“ off” or “Starting at ) and keep the fine print minimal. If you have variable pricing, use a short value statement and send details to a landing page.
A clean offer + simple CTA typically outperforms a long price list.
Use a QR code to a dedicated landing page and add UTM tags for each route or partner. Track scans, form fills, and calls to identify the placements that actually convert.
For non-QR audiences, include a short, memorable URL or a trackable phone extension.
Start where your customers already are: complementary businesses, community boards, local events, and targeted neighborhoods. Ask partners for the most visible spot and refresh before your flyer gets buried.
Use a consistent route and restock winners; small, repeated placements usually beat one big drop.
Submit a print-ready PDF (CMYK) at 300 DPI with 0.125" bleed and safe margins around important text. Keep thin lines above 0.5 pt and make QR codes at least ~0.8" square for reliable scanning.
Use vector logos when possible and limit your fonts to maintain a clean, professional look.
Request a proof so you can confirm spelling, margins, and QR/URL accuracy before production. Proofing is the easiest way to prevent expensive reprints.
Double-check phone numbers and offer terms first—those are the most common issues.
Match your flyer headline and offer to the landing page headline so visitors feel they’re in the right place. Keep the CTA consistent and make the page fast to load and easy to complete on mobile.
If you run ads, retarget QR visitors with the same offer to improve conversions.
Plan steady supply for HOA boards, hardware counters, and partner showrooms. Smaller top-up runs match weather cycles without waste.
Track QR scans by route and restock where response is highest. Use consistent visuals so neighbors recognize your brand quickly.
Field-ready paper flyers help crews stay visible across weeks.
Use bulk siding installation flyers to stock partner counters across service areas.
Log placements and refresh cadence so the tight loop stays active while offers remain aligned.
For storm-driven demand, deploy urgent runs and follow with a steadier cadence for rebuild season.
Keep one standard layout and rotate offer lines quarterly. Consistency builds brand recall while allowing controlled testing.
Bundle reorders with planned restock windows to reduce shipping costs and maintain availability during busy periods.

