Canva is fast, but flyer printing is unforgiving. A template that looks perfect on screen can become blurry, clipped, or hard to scan if you export the wrong file type or if your QR code is too close to the edges.
This guide shows you what makes Canva templates “print-ready” and how to export correctly so your flyer survives trimming and still converts.
A Canva flyer is print-ready when your final export uses PDF Print, your QR/CTA content stays inside the safe zone (0.125 inch), and your QR remains high-contrast and properly sized.
- Why template selection matters more than design tools
- What to look for in a template
- QR code placement rules in Canva
- Interactive: Canva template selector
- Interactive: PDF Print export settings checker
- A print-first checklist before you upload
- Browse 6 print-friendly example picks
- Top 10 Canva Flyer FAQs
Why template selection matters more than design tools
A template is not just aesthetics. It is an implied production plan: how your content aligns, how your margins work, and how your QR/CTA survives trimming. Canva templates vary in how well they respect these rules.
Templates that convert have predictable layout geometry
Look for templates that use clear section blocks and keep the CTA area visually separated. A good template makes it easy to replace content while preserving spacing for QR scanning.
Templates that break most often fail on edges
Most print failures in Canva come from edge issues: backgrounds not extending to bleed, elements positioned too close to the trim line, or exports that apply unwanted margins or scaling. Those problems are often fixable, but they are faster to avoid.

What to look for in a template
When you choose a Canva template for flyer printing, prioritize features that protect readability after production.
- High-resolution assets: templates using crisp images reduce the chance of blurry photos once you export.
- Readable typography: headlines should remain sharp; CTA text must be bold enough that it stays distinct.
- Consistent margins: elements should not “float” unpredictably when you edit.
- QR-friendly spacing: templates should leave a clean background area where you can place a QR and instruction line.
- Modular sections: you want blocks so you can update offer details without moving your QR.
- Bleed-aware backgrounds: full-bleed color blocks reduce visible trim gaps.
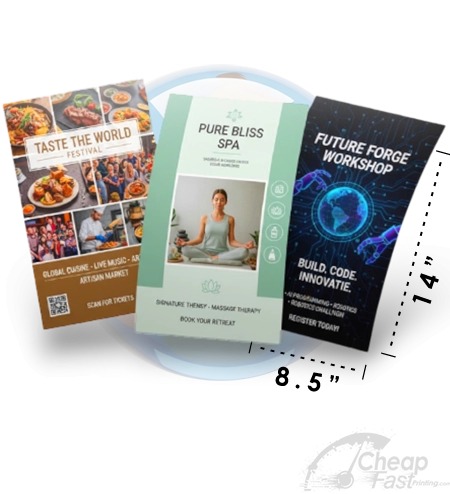
QR code placement rules in Canva
QR success depends on quiet zone, contrast, and physical size. In Canva, treat your QR like a production element, not a decorative icon.
Keep QR inside the safe zone
Use a safe-zone mental model: keep the QR at least 0.125 inch inside trim edges. That protects QR and CTA from trimming variation and cut differences.
Use short instruction text next to QR
People scanning flyers need context. A short instruction like “Scan to book” or “Scan for details” is more effective than a generic QR.
Avoid QR over busy gradients
If you place a QR on top of textured gradients or dark photo areas, the QR may still scan but can become less reliable. Use a clean panel or a solid/tint rectangle behind the QR.
Canva print-first setup (so templates stay reliable)
Think of your Canva template as a production system. Editing your flyer should change content, not production geometry. The easiest way to keep QR scanning reliable is to preserve the template’s layout structure and only swap text, images, and colors in the intended areas.
1) Typography: size, weight, and spacing you can trust
Templates often look great with headline fonts that are “screen-perfect,” but flyer printing punishes thin strokes. When you edit a template, treat the CTA and headings as the non-negotiable elements. Make headlines bold enough that they remain distinct after printing and trimming, and keep CTA text large enough that it does not rely on super-thin letterforms.
- Use heavier weights for the CTA and key headings.
- Avoid extremely tight letter-spacing for printed CTA lines.
- Prefer simple line breaks over tiny multi-line paragraphs near edges.
- If the template uses a shadow or effect on text, reduce it or test it in a proof export to ensure readability.
2) Images: resolution and replacement workflow
When you replace template images, keep an “image hygiene” rule: use assets that are high resolution at the final print size. Do not rely on Canva to magically fix low-resolution images; a blurry photo can still look acceptable on screen, but printed flyers reveal softness in faces, logos, and QR-adjacent graphics.
Practical image workflow:
- Choose the final crop inside Canva first, then insert a replacement image that matches that crop.
- Avoid upscaling tiny images because it increases blur and banding risk in gradients.
- If your design relies on a brand icon, use the highest quality version (vector when possible) so the icon does not pixelate.
- Keep important graphics away from the trim edge; Canva effects and strokes can be clipped if you push near edges.
3) Bleed/crop: how to keep full-bleed backgrounds safe
Full bleed is the difference between a premium look and a “cheap trim gap.” In Canva, this usually means you must ensure the template page size matches your production size and that backgrounds extend to the bleed boundary. Because each print workflow is different, treat bleed like a verification process.
Use this method before you upload:
- Confirm the page size in Canva matches your flyer size.
- Verify that your background shape/color reaches the page edges (not stopping inside a margin).
- Keep QR/CTA content inside the safe zone (0.125 inch target).
- Export one test page as PDF Print and review it at final scale.
4) Contrast: test your CTA/QR pairing as a single decision zone
Many flyer designs fail because the CTA is visually “available” but not scannable. In print, your best practice is to design the QR and CTA as one action zone: QR should have a clean background, CTA text should be high contrast, and both should be placed in a region that will remain inside the safe zone after trimming.
If you want a quick sanity check in Canva, zoom in until you can visually confirm the QR edges are crisp and the CTA text is not thin. Then, always validate with a real test print when possible.
Common Canva mistakes that break print quality
- Exporting as JPG/PNG instead of PDF Print.
- Using “fit to page” or allowing scaling to change final geometry.
- Placing QR too close to the edge so trimming removes quiet zone padding.
- Leaving decorative text effects on CTA fonts without proofing readability.
If you are changing images or moving the QR, print one proof flyer (even a single sheet) and scan it immediately with your phone. That one test catches most Canva export mistakes before they become a full batch reprint.
Interactive: Canva template selector
This widget recommends a template style and section strategy based on your flyer purpose and chosen print size.

Interactive: PDF Print export settings checker
Export quality determines whether your text and QR remain crisp. Use this checker to validate your Canva export decisions.
A print-first checklist before you upload
Before you upload your Canva design, do a quick print-first pass. This protects you from the most common production issues.
- Confirm page size matches your production size. Do not rely on resizing later.
- Move QR away from edges and ensure the QR sits on a clean, high-contrast background panel.
- Check CTA font weight. Flyers fail when CTA is too thin and becomes unreadable on paper.
- Use enough whitespace around the QR so quiet zones remain intact after trimming.
- Verify images are not too low-resolution after you replace template photos.
- Export PDF Print, not JPG/PNG, and keep bleed/crop marks consistent with your flyer size.
If you treat templates as production systems instead of decorations, Canva becomes an incredibly effective flyer tool.
Browse 6 Print-Ready Example Picks
These allocated products are examples that match the print-readiness mindset: strong readability, structured CTA zones, and paper/media behavior that supports scanning.