

Standard Sign Sizes 24×36 & 20×30 Inches: The Ultimate Template Guide
Just in case you just want to download free pre-designed templates for yard signs 24”x36” and or 20”x30” here are the 2 direct links for these specific sizes, already trimmed perfectly to the exact needed size, pixels, resolution, DPI, and color settings:
- Standard sign size 20” x 30” inches free template guide file download (JPG)
- Standard sign size 24” x 36” inches free template guide file download (JPG)
We like it when people say “size doesn’t matter” when talking about the standard sign sizes 24×36 and 20×30 inches, because we are really sure that size does matter on every aspect of the marketing process, for customer impact, for pricing, for sign manticulation, transportation and shipping, and many other factors that people usually don’t think about.
We have decided to talk about this topic, because we have been getting many search hits for this specific keyword by google: standard sign sizes 24×36 20×30 inches template guide
No matter the industry you are in, let’s say you are a Real Estate agent that is preparing for the next big open house event, or maybe you are a bride welcoming 24×36 inches easel, or as simple as just a business owner that needs a style side-walk 20×30 inches sign, we all can benefit of these specific sizes yard signs.
Here at CheapFASTprinting, we have already helped hundreds of different cases like this to build (with the free and paid graphic design service we offer). Thanks to this volume, we can understand better what works and what doesn’t work, this way we figure a pattern…. While we know that the standard size 18”x24” sign is for sure the most popular one, the 24”x36” and 20”x30” special sizes can cause are among the most confusing sizes for customers, as they don’t know which one to pick for their specific case
Common questions are, which one is the best choice for an easel? or which is the one that will fit perfectly on a A-frame sign type? also we get questions about the design file, like, how many pixels should the file have for a 36-inch print? We have gathered all these doubts, so we can clear them up for you perfectly so you know exactly what you need and how to proceed.
This 2026 guide, will help you understand and execute correctly all the right dimensions, specs, visual comparison, file setup, free template download and how to setup in Canva as well as Photoshop.
Part 1: The Technical Specifications
We want to stablish a starting point before we get started discussing the design, lets take a deep look at the math on this matter, as this is often the very first sign of failure when self-making these size signs and leading to a secured blurry or pixelated print out.
1. The 24×36 Inch Standard (Architectural D)
We like to call it the Architectural Standard or Large poster size for a very good reason, because its dominant and demands exclusive attention.
- Imperial Dimensions: 24″ width x 36″ height (or landscape: 36″ w x 24″ h)
- Metric Dimensions: 609.6 mm x 914.4 mm (60.96 cm x 91.44 cm)
- Aspect Ratio: 2:3
- Pixel Dimensions (300 DPI – Best Quality): 7200 x 10800 pixels
- Pixel Dimensions (150 DPI – Standard Quality): 3600 x 5400 pixels
- Minimum File Size (JPG): Usually ranges from 5MB to 15MB depending on complexity.
2. The 20×30 Inch Standard (The Photographer’s Choice)
The 20” x 30” is often nicer to the customer eyes, because it’s the exact bigger multiple of the mostly popular 4”x6” postcards used for marketing and events.as well as the 35mm film ratio.
- Imperial Dimensions: 20″ width x 30″ height
- Metric Dimensions: 508 mm x 762 mm (50.8 cm x 76.2 cm)
- Aspect Ratio: 2:3
- Pixel Dimensions (300 DPI – Best Quality): 6000 x 9000 pixels
- Pixel Dimensions (150 DPI – Standard Quality): 3000 x 4500 pixels
The Aspect Ratio Secret
These two-sign selection have a very perfectly similar 2:3 aspect ratio, this is always good topic to keep in mind when deciding about which size to go. This also, makes the path easier for graphic designers, that means that if you already made a 20×30 or 4×6 design, we will just need to re-scale it up for the next available size, in this case the 24×36, or scale it down to the needed final size. But this ratio compatibility is a good mathematical similarity to keep in mind when deciding to go ahead with this project.
Which one is not identical, and often gets confused over? The Standard letter paper (8.5” x 11”) size, that is NOT the same ratio at all. If you have the raw 8.5×11 design file, minor adjustments can lead to a final correct sign design build up, but not just re-scaling it or stretching it.
Part 2: Visual Comparison & Use Cases
So, we finally get to the question, why should we choose one size over the other? When the difference is only about 4 to 6 inches? … It sounds little inches difference, but in real life, the difference is massive!
- 20×30 Surface Area: 600 Square Inches
- 24×36 Surface Area: 864 Square Inches
The 24×36 sign is 44% larger than the 20×30. Believe it or not, that is already nearly half-again as big, which drastically changes how the sign is perceived by the human or customer eye.
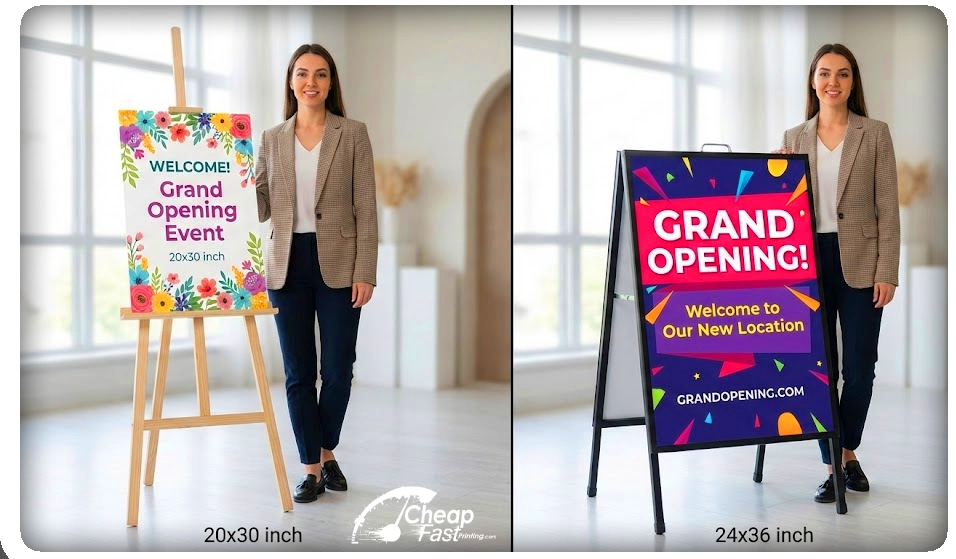
When to choose 24×36 (The Attention Grabber)
Specially thanks to its massive big size, we recommend this one better to be used on moving traffic (cards, bus) You will need bigger text and images to be easily observable even while moving.
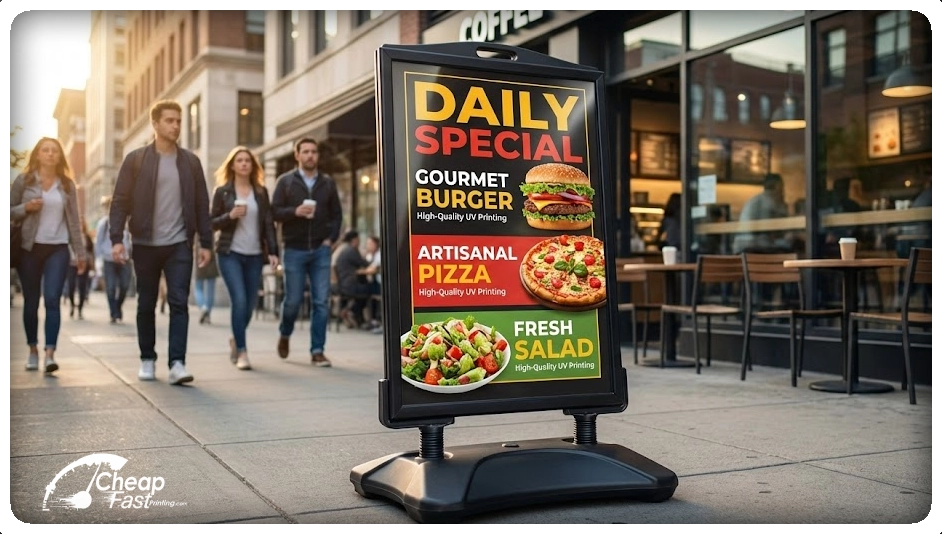
- A-Frame Sidewalk Signs: We call it as the sandwich Deluxe board sign, printed as posters that will fit in the as inserts on the 24×36 A-stand. Loved by restaurant owners and retail shops all over the USA.
- Real Estate Colonial Posts: When showcasing a very large or very luxury house or property listing, the yard sign in 18×24 somehow denotes you did not care much about the dimensions of your print outs… This sort of properties, demands at least a 20×30 or to go for a sure run, the 24×36 to look proper and sized correctly to the situation.
- Trade Show Posters: Many event cabins and very crowded side-walks are levering from this poster size as it can be hanged falling from the ceiling and be seen from the distance instead of waiting for food traffic to get to the area where you are showcasing the local floor promotional signs.
- Construction Site Signage: For signs showcasing Permits signs, Alert and Avoid objects big notifications, as well as safety rules, and the most popular “Coming Soon” with future visual renders of what’s coming, are almost exclusively printed on 24×36 or larger.
When to choose 20×30 (The Elegant Standard)
If your store is graced with a lot of foot traffic, this is the right choice for you, specially for corners where customers needs to stay standing still for a while, usually waiting for the light to change or for slow walking zones, this 20” x 30” sign can drastically help you show your message without overcoming too aggressive with bigger sizes options.
- Wedding Easels: When in need to showcase the sitting chart on a wedding entrance, or a welcome sign for your guests, this 20×30 also becomes top choice without thinking much about it.
- Retail Window Displays: For window promotions and product display we don’t always have massive window space that can be used for covering it up with a sign, so you can go easy on this with a nicer, smaller 20×30 instead of going all the way with the bigger options.
- Art & Photography Prints: There are many pre-fabricated frames specially made for photographs art prints that already come ready for this size, becoming a more usable print size option.
- Indoor Directional Signage: Avoid obtruding pathways specially on offices and lobbies for conference, keep the size decent and practical with the smaller option.
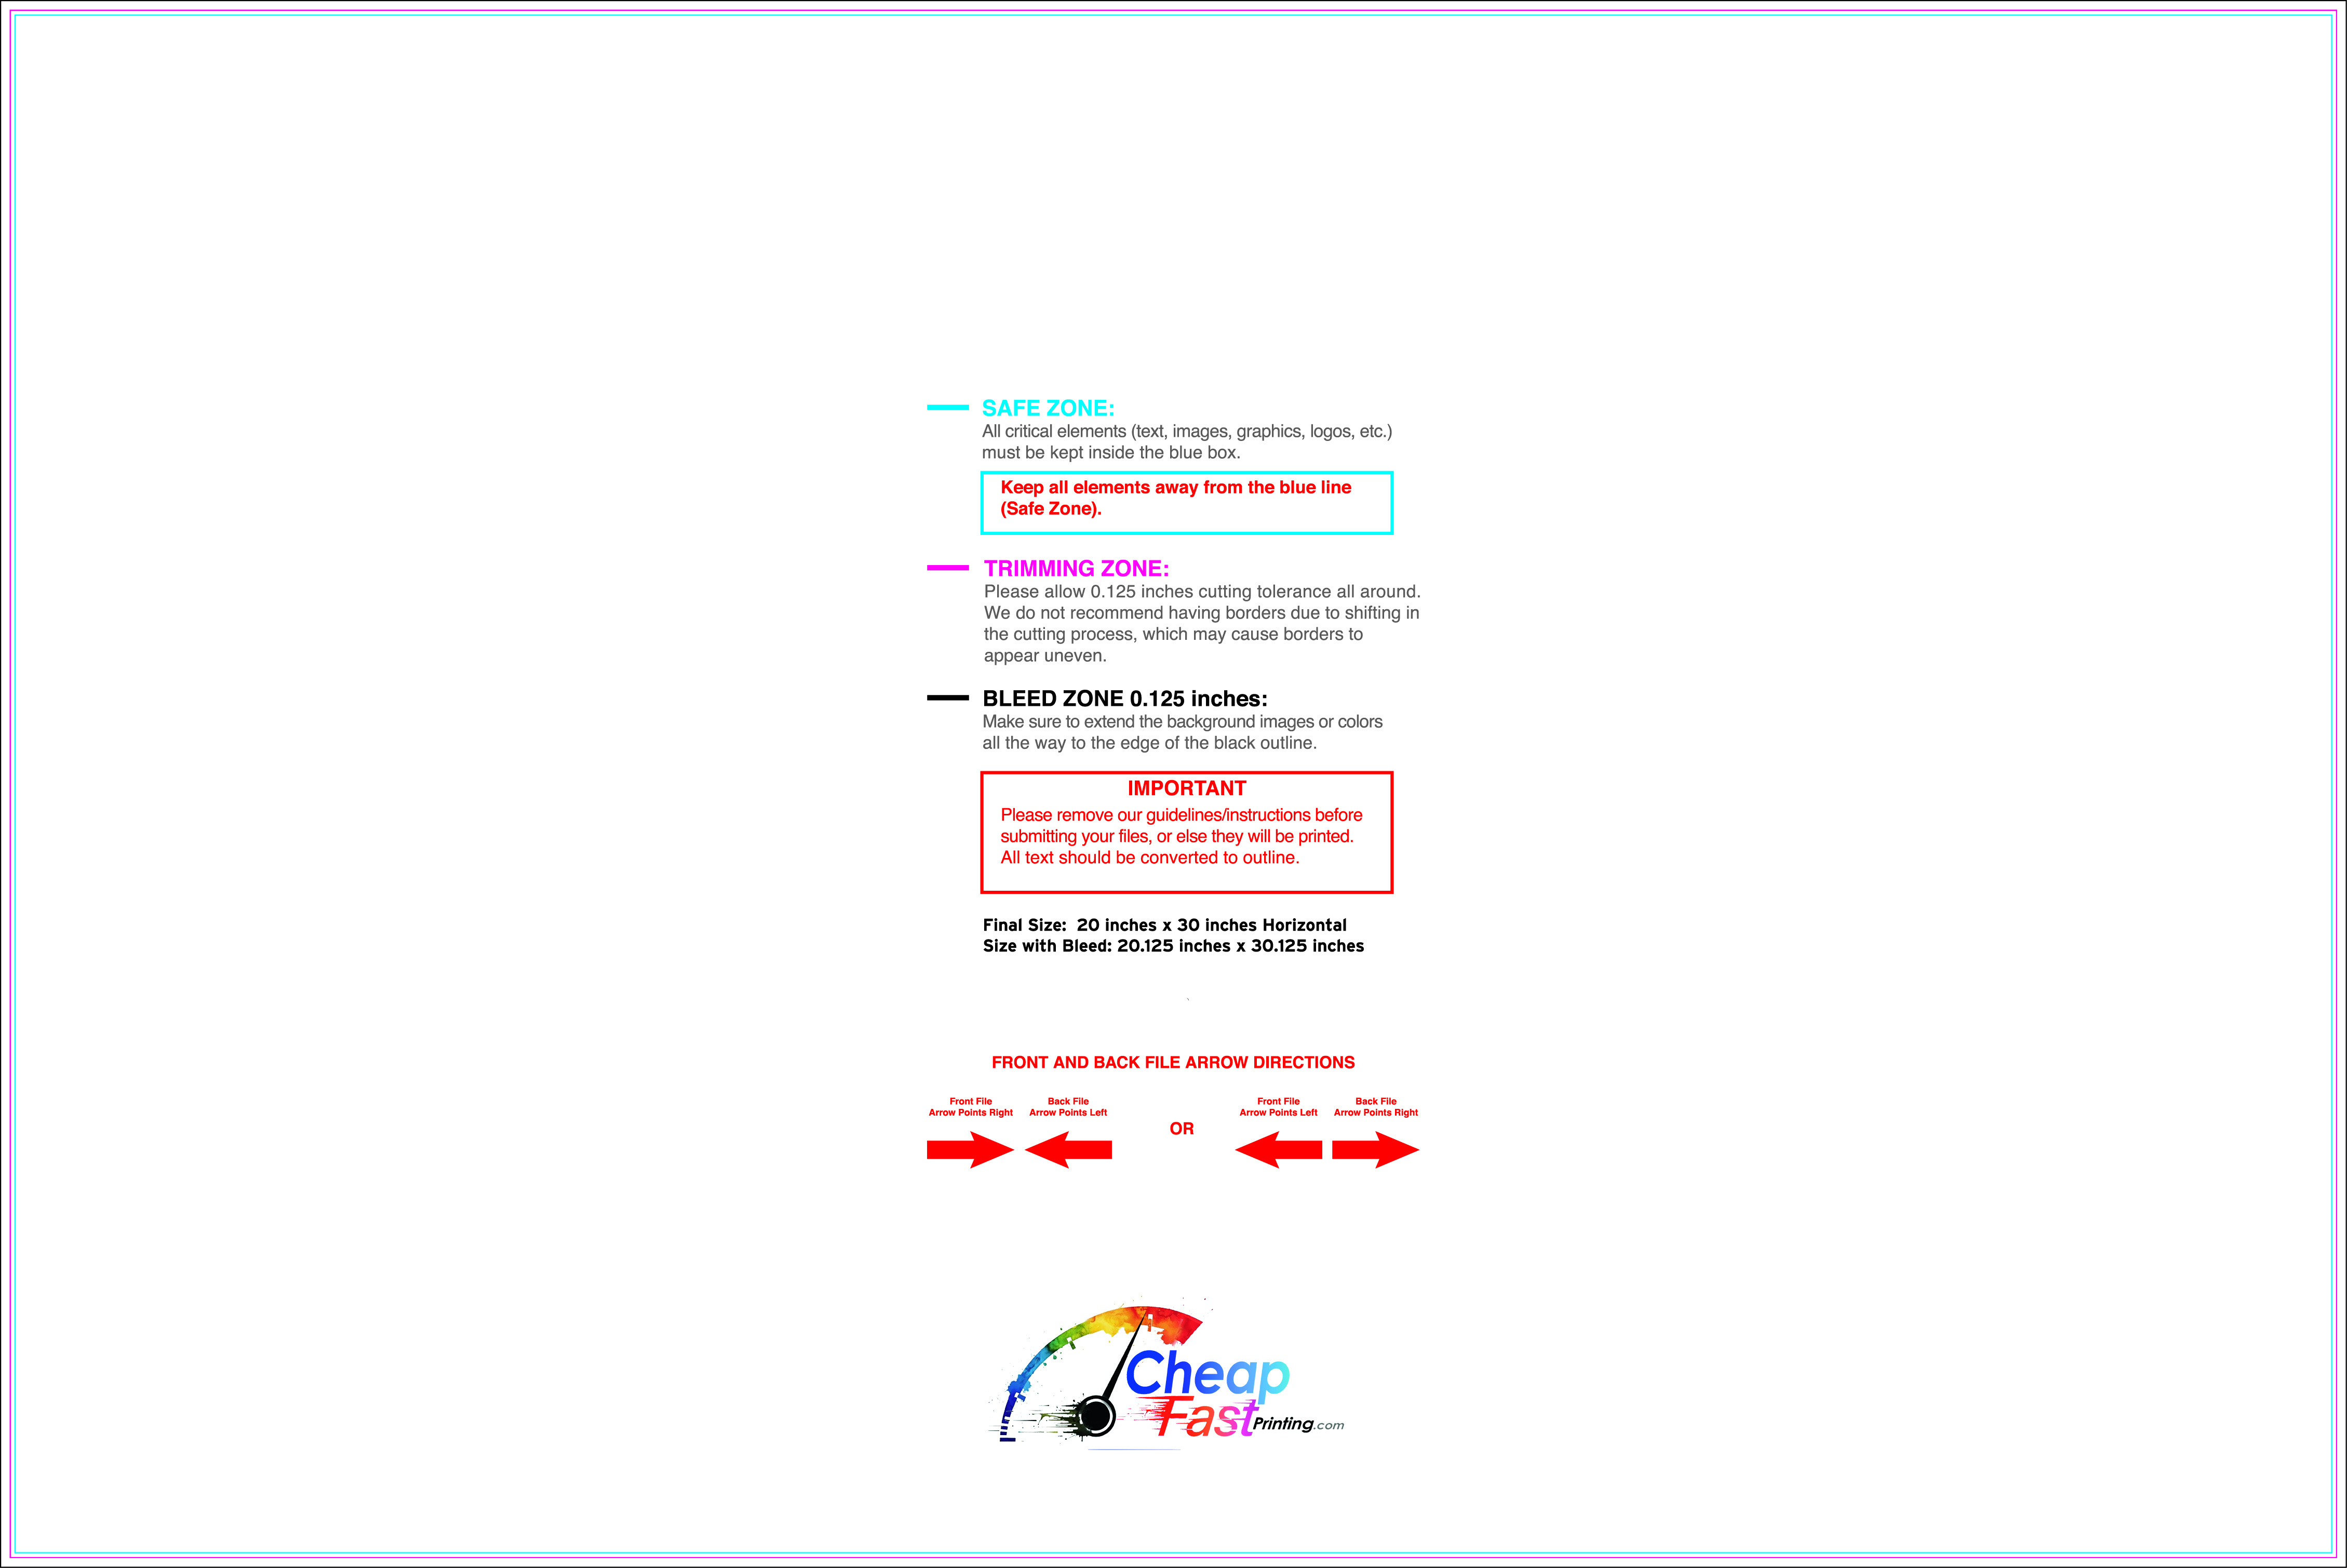
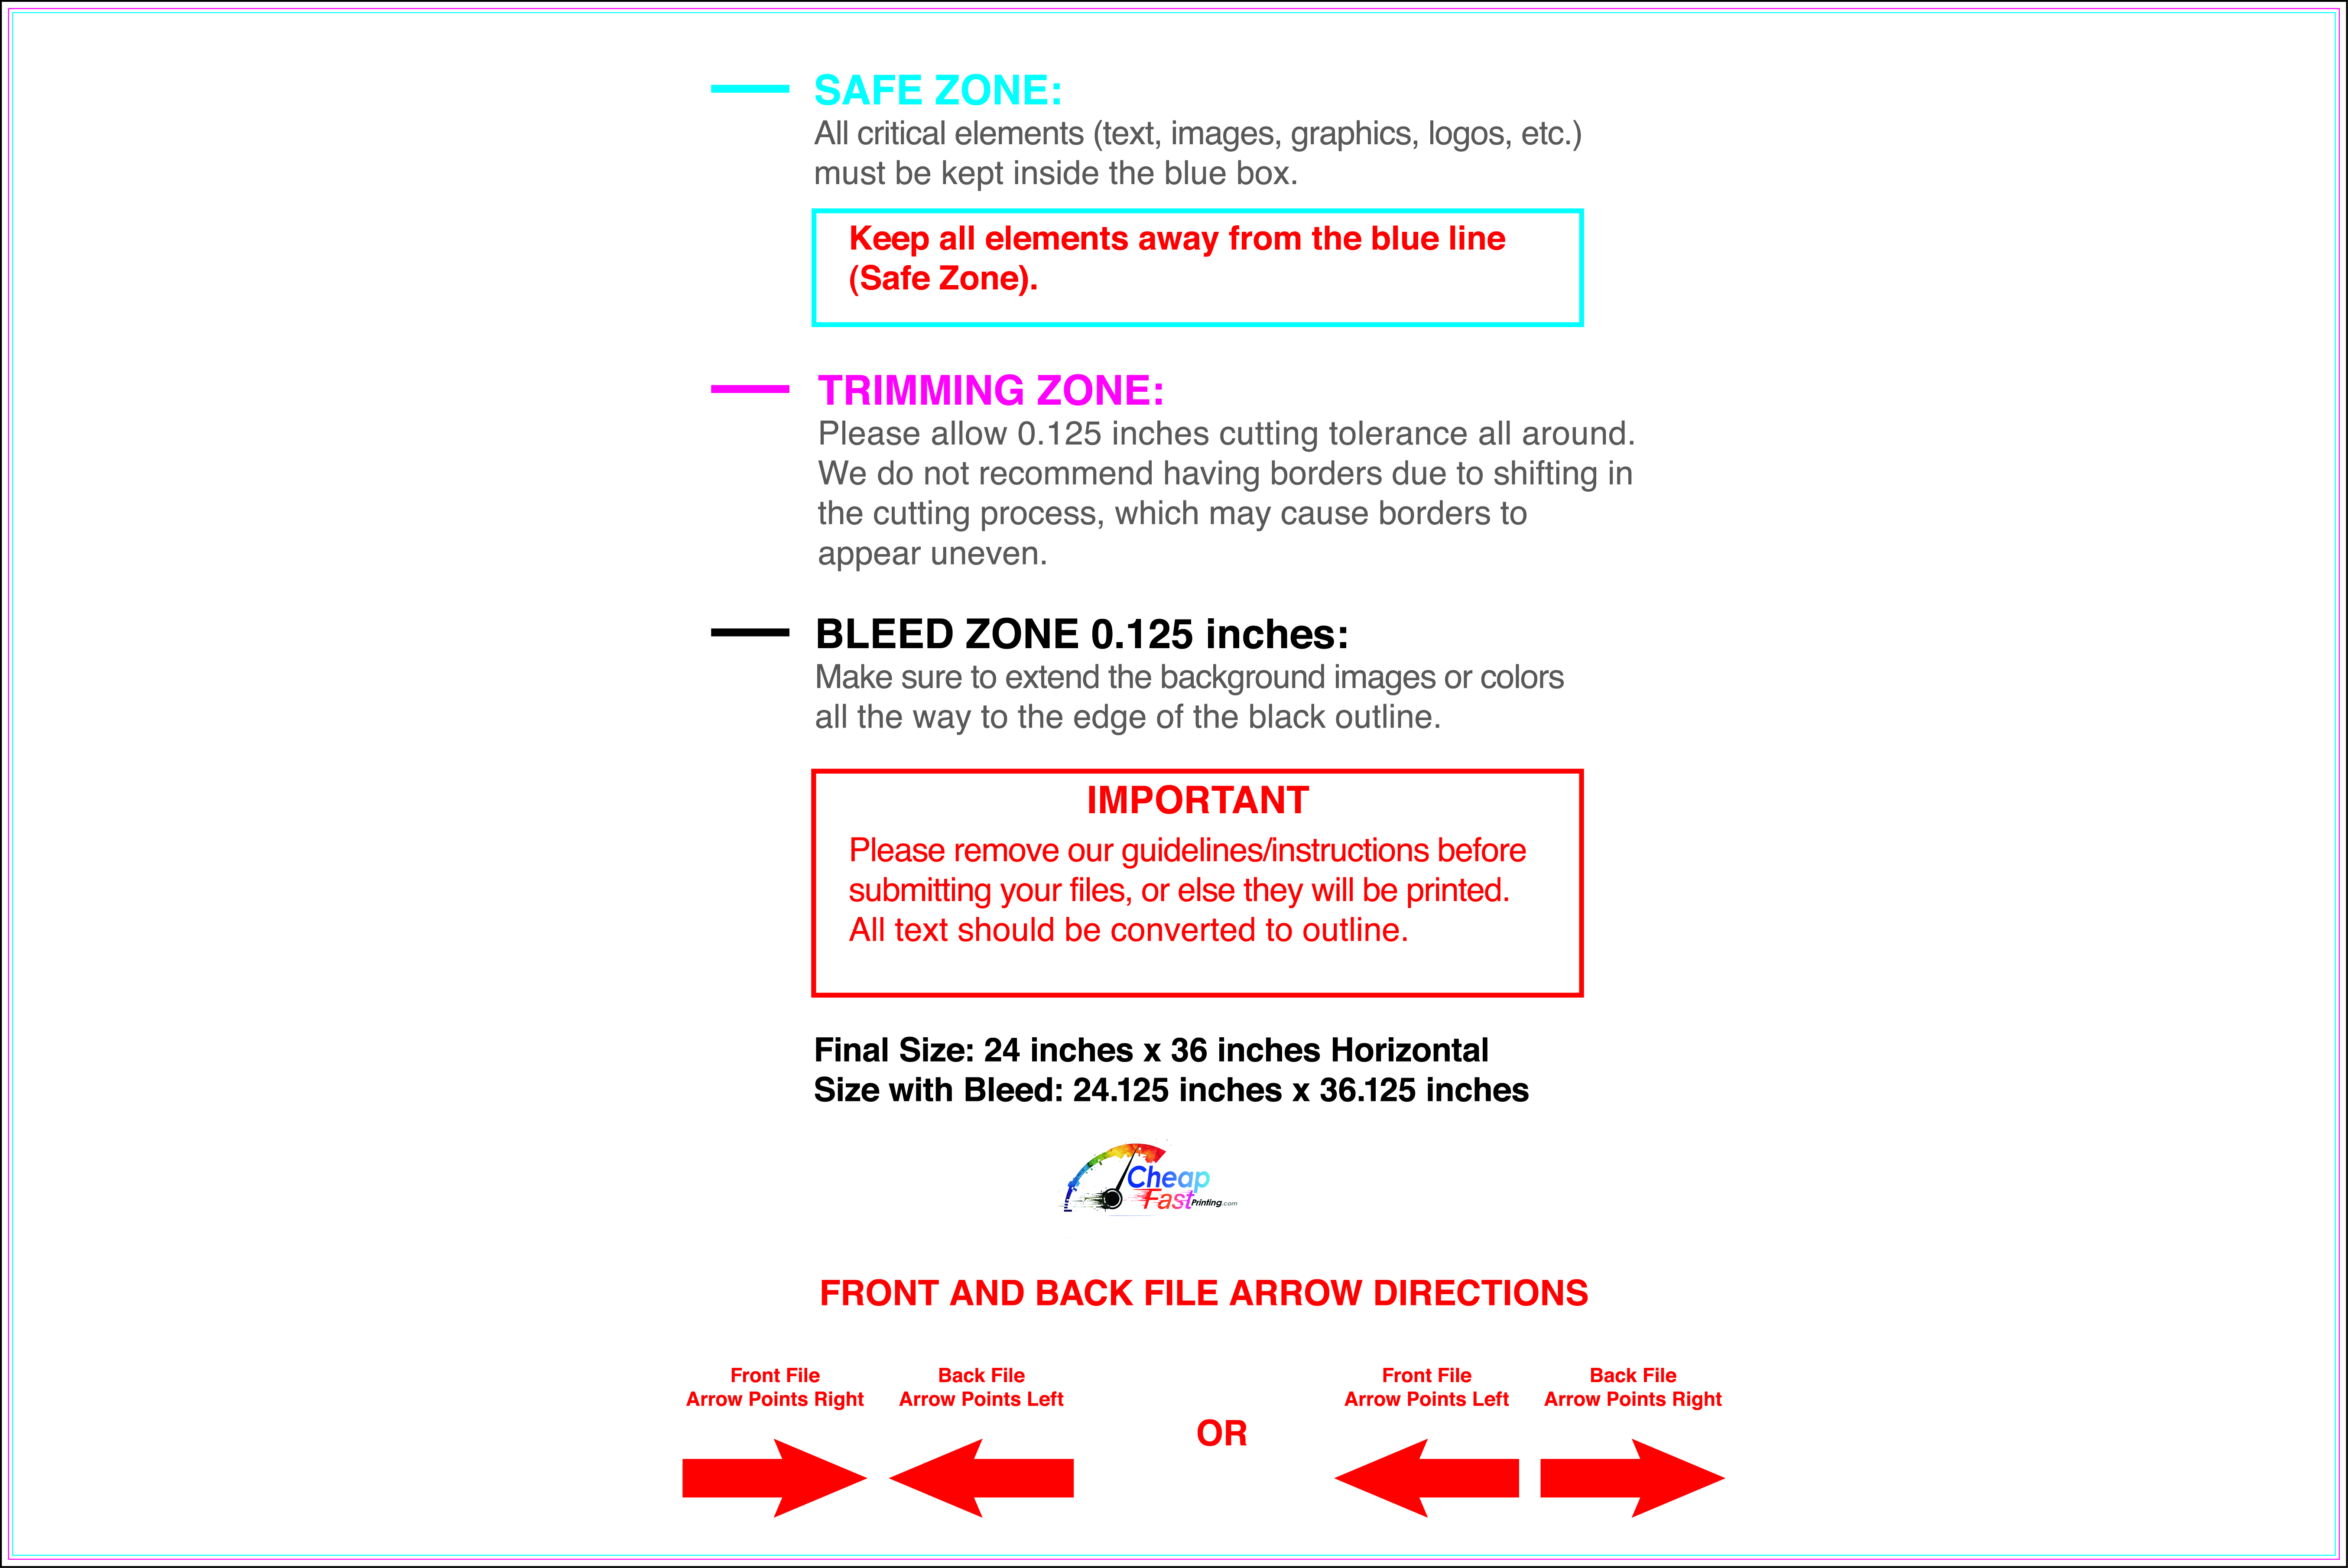
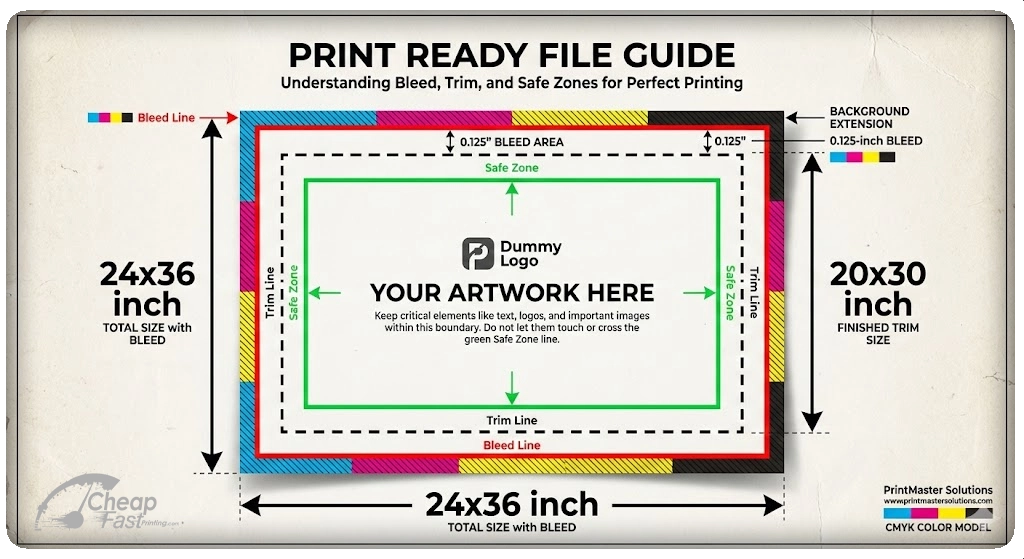
Part 3: The “Bleed” and “Safe Zone” Guide
If you take nothing else away from this article, let it be this section. This is the number one reason print orders get delayed.
When we print your sign at CheapFastPrinting.com, we print it on a large sheet of material and then a digital cutter slices it out. No mechanical cutter is 100% perfect; there is always a variance of a millimeter or so.
To prevent your sign from having a thin, ugly white line on the edge, you must use Bleed.
The Rules of the Bleed
If you are not familiar with the term ‘bleed’, don’t worry, its simple. You must extend your background artwork past the final size of the sign. We usually leave around 0.125″ extra space all around the art to make sure there is enough spacing for bleeding the print-outs while cutting it.
For a 24×36 Sign:
- Total Document Size: 24.25″ x 36.25″
- Trim Line: 24″ x 36″ (This is where we cut)
- Safe Zone: 23.5″ x 35.5″ (Keep text inside this area)
For a 20×30 Sign:
- Total Document Size: 20.25″ x 30.25″
- Trim Line: 20″ x 30″ (This is where we cut)
- Safe Zone: 19.5″ x 29.5″ (Keep text inside this area)
[IMAGE PLACEHOLDER: A diagram showing three concentric rectangles: The outer Bleed line (Red), the Trim line (Black), and the inner Safe Zone (Green). Visually demonstrating the 0.125″ extension.]
What is the Safe Zone?
The Safe Zone is usually 0.5 inches inside the trim line. You should never put a logo, a phone number, or a person’s face right against the edge of the sign. Not only does it look unprofessional, but if the cutter shifts slightly, you might lose part of that essential information.
Part 4: How to Set Up Your File (Software Guide)
We accept files from almost any design software, but here is how to set them up correctly in the most popular programs so your colors pop.
Don’t have a design? Don’t worry.
Remember, we offer completely free graphic design for all printing products. If setting up these files sounds too complicated, simply send us your logo and text. Our team of human designers will handle the bleed, safe zones, and layout completely FREE. We also offer free design edits and free file conversion.
Method A: Designing in Canva
Canva is great, but it defaults to screen settings. You need to force it to be “Print Ready.”
- Click “Create a Design” > “Custom Size”.
- Change the unit from “px” to “in” (Inches).
- Crucial Step: Enter the BLEED size, not the cut size.
- For 24×36, enter 24.25 width and 36.25 height.
- Design your artwork. Ensure background colors go all the way to the edge.
- Keep text about 1 inch away from the edges to be safe.
- Export: Click Share > Download > PDF Print.
- Check the box that says “Crop marks and bleed” (Optional, but helpful).
- Select “CMYK” (if you have Canva Pro) or “RGB” (we can convert it, but colors may shift slightly).
Method B: Designing in Adobe Photoshop
- File > New.
- Width: 24.25 Inches | Height: 36.25 Inches.
- Resolution: 150 (for distant viewing) or 300 (for close-up viewing) to ensure sharp text and images.
- Color Mode: CMYK Color (8 bit).
- Drag guides out to 0.125 inches on all sides to mark your trim line.
Method C: Designing in Adobe Illustrator (Best for Printing)
- File > New.
- Width: 24 Inches | Height: 36 Inches.
- Bleed Settings: Set Top, Bottom, Left, and Right to 0.125 in.
- Color Mode: CMYK.
- Raster Effects: High (300 ppi).
- When exporting to PDF, ensure “Use Document Bleed Settings” is checked.
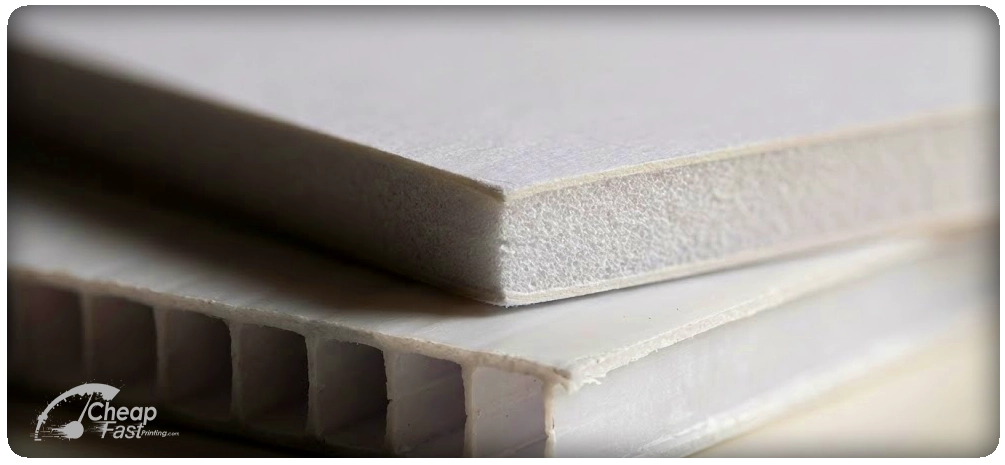
Part 5: Material Selection – What should you print on?
You have your file ready. Now, what material should you choose on our order page? The material you pick depends entirely on where the sign will live and the tactile experience you want to create.
1. 4mm Coroplast (Corrugated Plastic)
- The Vibe: Economical, outdoorsy, temporary.
- Best for: Yard signs, real estate, directional arrows, political signs.
- 24×36 Note: Because 24×36 is a large surface area, Coroplast can bend in high winds. If using this outside, you should upgrade from standard “H-Stakes” to “Heavy Duty Beefy Stakes” to prevent the wind from folding the sign over.
- 20×30 Note: Works perfectly on standard stakes.
2. 3/16″ Foam Board (Foam Core)
- The Vibe: Professional, smooth, rigid, indoor-only.
- Best for: Easel signs, presentations, check presentation checks, indoor mall signs.
- Warning: This material is paper-faced. If it gets wet, it is ruined. Do not use outdoors.
- Comparison: A 20×30 Foam board is very rigid. A 24×36 Foam board is also rigid but can warp slightly if left in a hot car or direct sunlight for too long.
3. 3mm PVC (Sintra)
- The Vibe: Permanent, hard, heavy, premium.
- Best for: Permanent wall signage, outdoor menus, long-term construction signs.
- Durability: This is a dense plastic tank. It can survive rain, snow, and sun for years.
4. Poster Paper (Semi-Gloss)
- The Vibe: Classic poster. Needs a frame or a window.
- Best for: Framing, window taping, backlit boxes.
- Note: We print these on high-quality photo paper stocks that allow colors to pop.
Part 6: Legibility and Font Sizes
A common disaster we see is “The Tiny Phone Number.” You design the sign on your laptop, and the text looks huge. But when you put the sign 30 feet away on a street corner, the text disappears.
We are positive to say that size does matter! It matters for the impact the sign makes at the time of being viewed.
Here is the Legibility Distance Chart for large format signs:
| Letter Height | Max Readable Distance | Best Impact Distance |
| 1 Inch | 30 Feet | 10 Feet |
| 2 Inches | 60 Feet | 20 Feet |
| 3 Inches | 90 Feet | 30 Feet (Street Traffic) |
| 4 Inches | 120 Feet | 40 Feet |
| 6 Inches | 180 Feet | 60 Feet |
For a 24×36 Yard Sign:
Your main headline (e.g., “OPEN HOUSE” or “SALE”) should be at least 4 to 5 inches tall. Your contact info should be at least 2 inches tall.
For a 20×30 Easel Sign:
Because people walk right up to easels, you can use smaller fonts. A 1-inch font is perfectly readable for a guest list or menu.
Part 7: Frequently Asked Questions (FAQ)
Q: I have a 24×36 file, can you shrink it to 20×30?
A: Yes! Because they share the same 2:3 aspect ratio, we can scale this down perfectly with no distortion. Just mention it in the order notes and we will handle it.
Q: Can I mail these signs?
A: Yes, but shipping costs vary. A 20×30 sign fits in a standard large flat rigid mailer. A 24×36 sign is considered “Oversized” by carriers like UPS and FedEx, which often triggers a surcharge. If you are shipping hundreds of signs to different locations, 20×30 is significantly cheaper to ship than 24×36.
Q: Which size is better for photos?
A: Most DSLR cameras shoot in a 2:3 ratio. Both 20×30 and 24×36 are perfect for full-frame photos with no cropping. However, if you are shooting with a smartphone (which is usually 4:3 ratio), you will have to crop a little bit off the top or bottom to fill either of these sizes. We can help you adjust the image free of charge.
Q: Do you sell frames?
A: While CheapFastPrinting.com focuses on the print itself, both of these sizes are “Standard US Frame Sizes.” You can walk into Michaels, Hobby Lobby, or IKEA and find frames for both 24×36 and 20×30 off the shelf without needing custom framing.
Q: How do I transport a 24×36 foam board?
A: A 24×36 board will lay flat in the trunk of a mid-size sedan or SUV. It might fit in the back seat of a small car. Be careful with wind; if you are carrying a 24×36 sign across a parking lot on a windy day, hold it with two hands… it acts like a sail!
Part 8: Comparison Table Summary
To summarize the differences to help you make your final decision:
| Feature | 24×36 Inches | 20×30 Inches |
| Best Used For | Outdoor, Traffic, Large Venues | Indoor, Easels, Retail, Art |
| Viewing Distance | 30+ Feet | 5-20 Feet |
| Aspect Ratio | 2:3 | 2:3 |
| A-Frame Compatible? | Yes (Standard Deluxe Size) | Rare (Check measurements) |
| Wind Resistance | Low (Needs heavy stakes) | Medium |
| Shipping Cost | High (Oversized) | Medium |
| Visual Impact | Dominant | Elegant |
Conclusion: Ready to Print?
Why Choose CheapFASTprinting?
Choosing between 24×36 and 20×30 ultimately comes down to location. If you are fighting for attention on a busy street, go big with the 24×36. If you are welcoming guests into an intimate venue or displaying photography, the 20×30 is the professional choice.
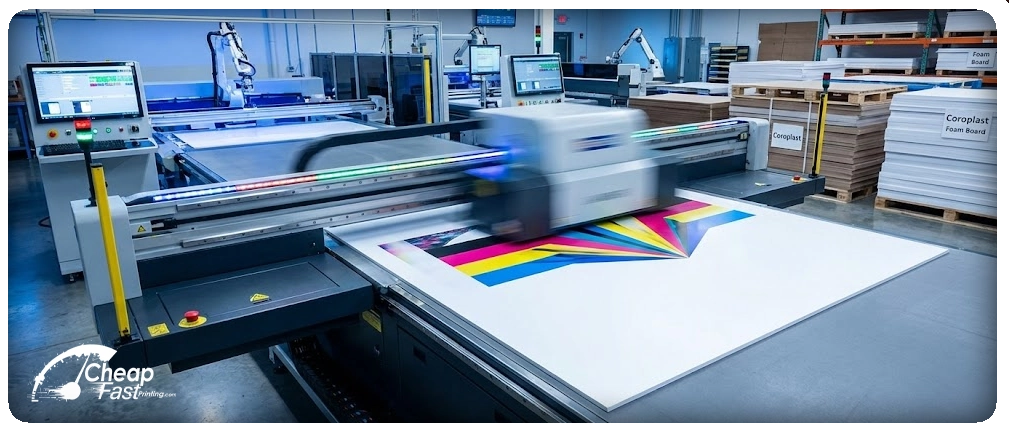
No matter which size you choose, CheapFastPrinting.com utilizes state-of-the-art flatbed printers to deliver crisp, vibrant, and weather-resistant signs.
We have years working in perfecting a model on efficiency and automation, without cutting corners to be able to deliver “cheap & fast” without sacrificing quality.
Next Steps:
- Download your template below to ensure your bleed is correct.
- Select your material (Coroplast for outdoor, Foam for indoor).
- Upload your file and let us handle the rest.
Don’t have a design?
Don’t be shy with us. Select “Free Design Setup” and our team will create a stunning, print-ready sign for you, completely FREE.