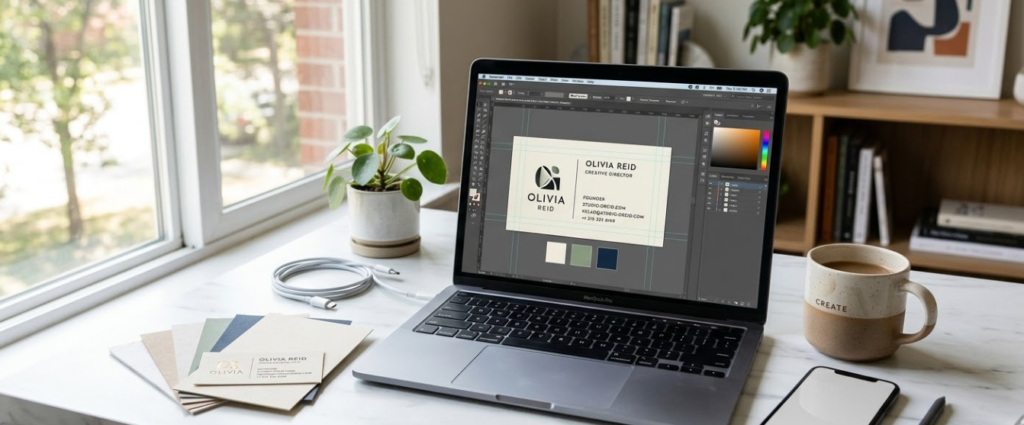
Here is something that used to take a graphic designer, three revision rounds, and a pile of money: designing your own professional business card. These days? You can build something genuinely impressive in under an hour with the right digital tools, zero design experience, and a solid understanding of what printers actually need from your file.
This is the guide that bridges the gap between “I made something that looks okay on screen” and “I printed something that looks amazing in real life.” Because there is a difference, and knowing it before you send your file to print saves you a lot of frustration, a lot of wasted money, and the very specific kind of disappointment that comes from opening a box of cards that are not what you imagined.
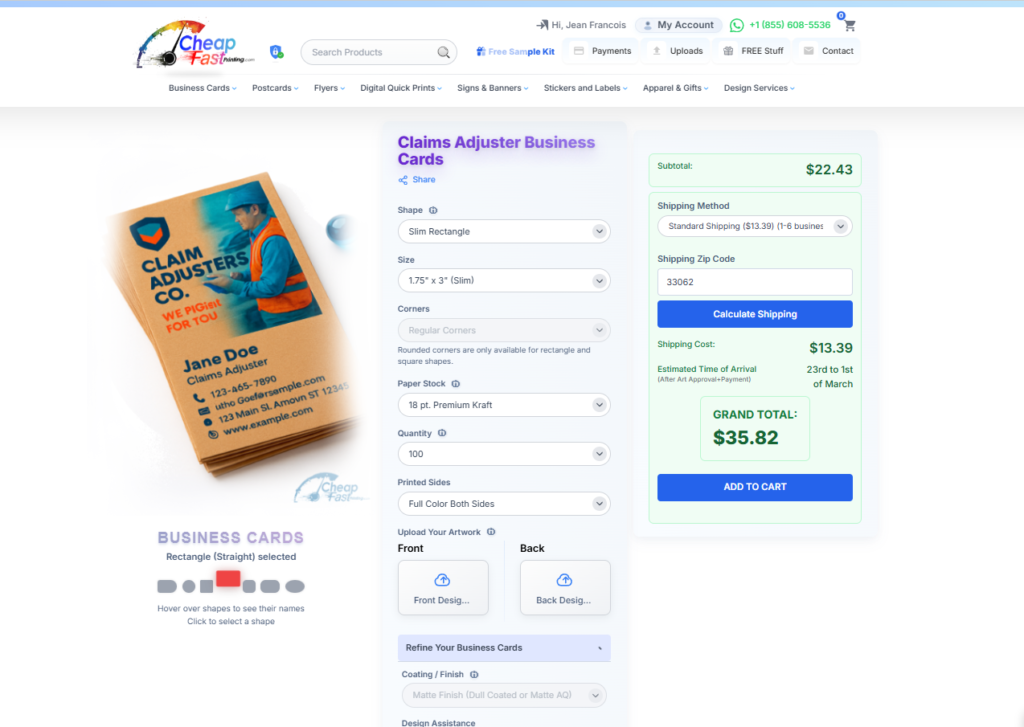
The biggest shortcut is not another app, it is starting from a layout that already works in print. CheapFastPrinting.com has 7,000+ free editable business card templates you can use as a practical reference while working in Canva, Adobe Express, or Illustrator. Start with the template hub, then browse niche examples in the industry gallery or targeted pages like graphic designer business cards, software engineer business cards, and product photographer business cards. That makes it easier to see what should go where before you export anything.
Most digital-tool mistakes happen when people design only for the screen. A real business-card example closes that gap immediately. You can study how the hierarchy behaves, how much information fits comfortably, and which shapes feel usable before you export from Canva or Adobe Express.
Templates reduce the blank-canvas problem and help you spend more time refining instead of just starting.
When you see a real print-ready direction first, it becomes easier to understand bleed, safe area, and how much room your content actually needs.
If the file still feels off after you build it in your app, we can tighten the print setup and proof it before production.
Why Digital Tools Have Replaced Traditional Design Software
Five years ago, designing a print-ready business card meant either hiring a graphic designer or learning Adobe Illustrator from scratch. Both options cost serious time or money, and often both. Today, platforms like Canva, Adobe Express, and AI-powered tools have leveled the playing field completely.
These tools come loaded with templates that are already sized correctly, pre-set with proper Industry Standard dimensions (3.5 by 2 inches), and increasingly offer export options that are print-ready. They take the technical complexity out of the equation and let you focus on the creative decisions: fonts, colors, layout, and content.
That said, there are still a few technical details you absolutely need to know before exporting your file for print. The most beautiful design in Canva can produce disappointing results if the export settings are wrong. We will cover all of them here, step by step, so you go into this process fully informed.
Best Digital Tools for Making Business Cards in 2025
| Tool | Skill Level | CMYK Export | Free Tier Quality | Best Feature | Limitation |
|---|---|---|---|---|---|
| Canva | Beginner | Pro version only | Excellent | Massive template library, drag-and-drop | CMYK only in paid tier |
| Adobe Express | Beginner+ | Yes | Good | Adobe Fonts integration, polished UI | Fewer templates than Canva |
| Figma | Intermediate | Via plugin | Free plan available | Precise vector control, collaborative | Learning curve for beginners |
| Adobe Illustrator | Advanced | Native CMYK | Paid only | Gold standard for print professionals | Steep learning curve, expensive |
| Photoshop | Intermediate | Yes | Paid only | Best for photo-heavy card designs | Raster-based, not ideal for vector logos |
| Affinity Designer | Intermediate | Yes | One-time purchase | Near-Illustrator quality at lower cost | Smaller template library |
Canva: The Easiest Option for Non-Designers
Canva is the most accessible design platform on the market, and for very good reason. Their template library has thousands of business card designs, all pre-sized and ready to edit. The drag-and-drop interface is intuitive enough that most people are designing confidently within their first session. You do not need any prior design knowledge to create something that looks genuinely professional.
Canva’s free tier is surprisingly capable. You can upload your own logo, change fonts and colors, add icons, and export a finished file. The paid tier (Canva Pro) unlocks more premium templates, a brand kit feature, and importantly, the ability to export in CMYK PDF format, which is what print shops need for accurate color reproduction.
One limitation worth noting: Canva’s built-in print service is decent but not exceptional for specialty paper stock and finishes. Many people use Canva to design and then export their file to a dedicated printing service like CheapFastPrinting.com for the actual printing, which gives you the best of both worlds: Canva’s easy design interface plus our State-of-the-Art printing quality and Free Design review.
How to Set Up the Right Canvas Size in Canva (Step by Step)
From the dashboard, click the purple ‘Create a design’ button in the top right corner.
In the dropdown, scroll to the bottom and select ‘Custom size’ rather than any preset.
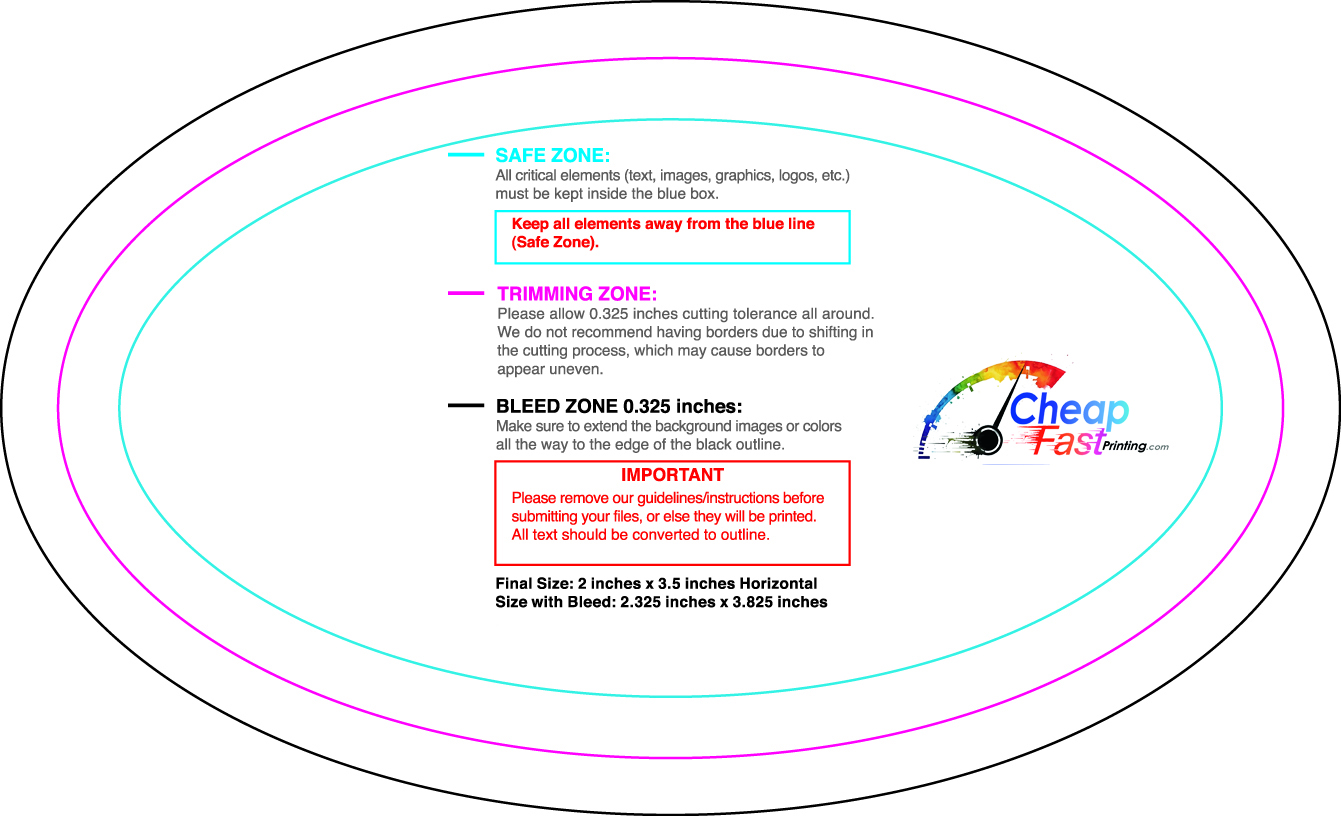
This includes the 0.125-inch bleed on each side. If you enter the dimensions in pixels, use 1125px x 675px at 300dpi equivalent.
Keep all important text and logos at least 0.125 inches (about 10-12 pixels at this canvas size) from the outer edge.
Click Share > Download > File type: PDF Print > Check ‘Crop marks and bleed’ > Download. This is the critical step most people miss.
- File type: PDF Print (NOT PDF Standard, JPEG, or PNG)
- Enable: ‘Crop marks and bleed’ checkbox must be checked
- Resolution: Canva automatically exports at 300dpi in PDF Print mode
- Color: Canva free exports RGB. Canva Pro exports true CMYK PDF.
- Tip: If on free tier, upload your PDF to CheapFastPrinting.com and we convert CMYK for free
Adobe Express: Professional Results in Minutes
Adobe Express sits between Canva’s simplicity and the full power of Adobe Illustrator. The template library is curated and generally higher in design quality than Canva, reflecting Adobe’s deep design heritage. Adobe Express also integrates seamlessly with Adobe Fonts, giving you access to a massive professional typeface library that most design platforms charge extra for.
For anyone already in the Adobe ecosystem, Express is a very natural fit. The export quality is excellent, and the interface is cleaner and more polished than most competitors. The trade-off is that the free tier is more limited than Canva’s, and some of the best templates require a paid Creative Cloud subscription.
Figma and Illustrator for Advanced Users
If you have design experience, Figma gives you much more control over vector elements, typography, and layout precision. It is particularly strong for collaborative projects where multiple team members need to review and edit a card design. Figma exports to PDF, though CMYK support requires a plugin.
Illustrator remains the gold standard for print design, with full native CMYK support, precise bleed settings, and output that professional print shops love. But here is the honest truth: you do not need advanced software to get professional print results. We have seen stunning business cards come from Canva exports, and mediocre ones come from Illustrator. The tool matters less than knowing what settings to use when you export.
CMYK vs RGB: Why It Matters for Printing
This is the single most important technical concept for anyone designing materials for print. Understanding it will save you from the most common disappointment in DIY printing.
| Factor | RGB (Screen) | CMYK (Print) |
|---|---|---|
| What it stands for | Red, Green, Blue light | Cyan, Magenta, Yellow, Black ink |
| Used for | Computer monitors, phone screens, web | Professional offset and digital printing |
| Color mixing method | Additive (light adds up to white) | Subtractive (inks absorb light to create color) |
| Colors available | 16+ million colors via light emission | Smaller but print-accurate color gamut |
| Bright neons and vivids | Displays perfectly | Often impossible to reproduce accurately |
| What happens at printer | Colors SHIFT during conversion | What you set is what gets printed |
| Best practice | Design mockups and digital assets | All print-ready files for business cards |
The big practical impact of getting this wrong: very bright blues often shift toward purple when converted to CMYK. Neon greens become more muted and yellowish. Some vivid reds and oranges change noticeably. To avoid surprises, design in CMYK from the start if you are using professional software, or let your print shop handle the conversion with a preview proof.
At CheapFastPrinting.com, we check and optimize every file’s color mode as part of our Free Setup process, completely free of costs, and we always send a digital email proof so you can see and approve the colors before we print a single card. This safety net makes all the difference.
Step-by-Step: Building Your Card in Canva (Complete Walkthrough)
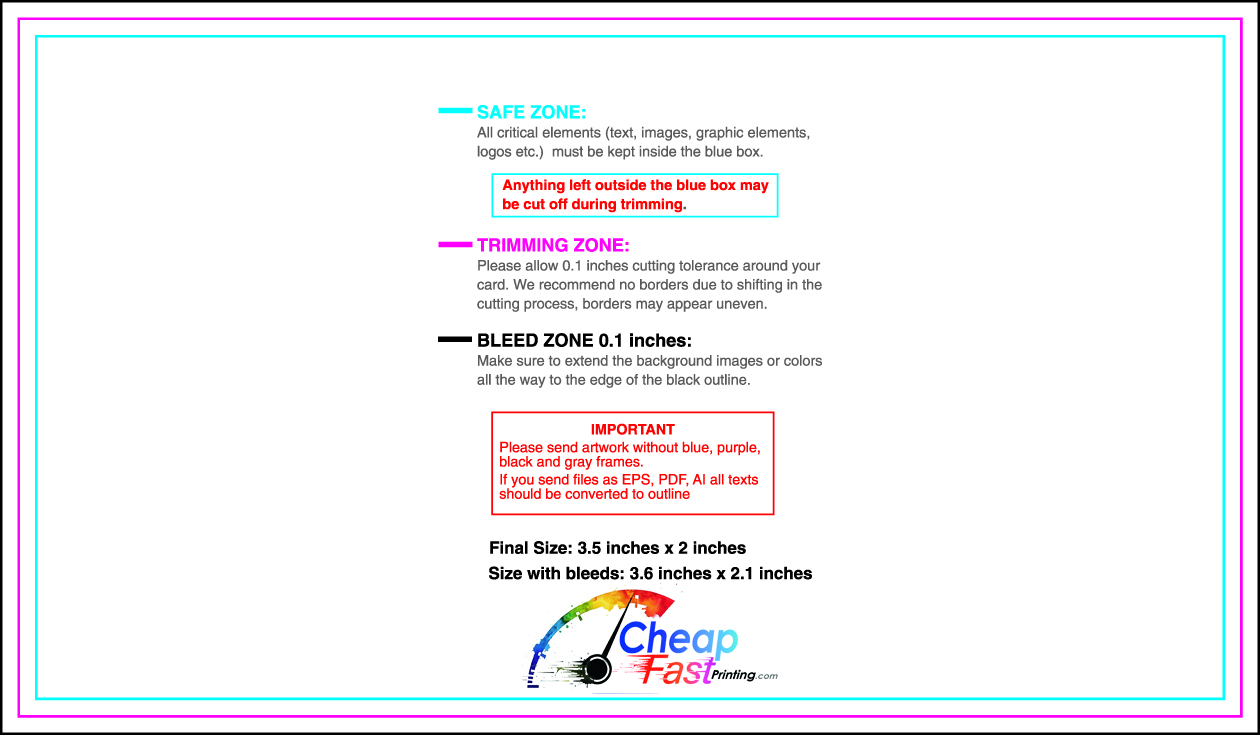
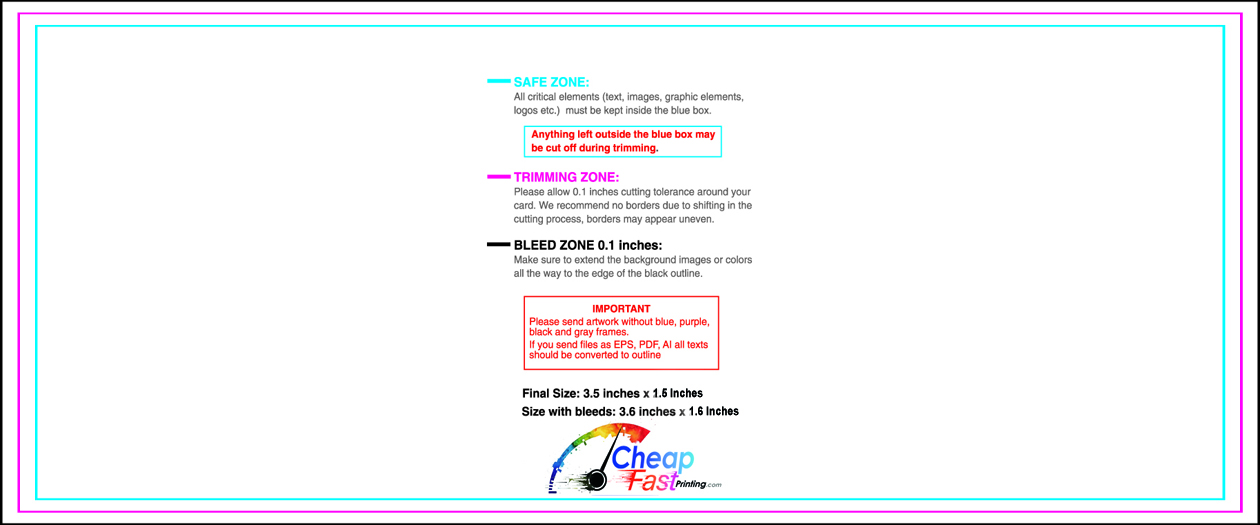
This is 3.5″ final size plus 0.125″ bleed on each side. This is non-negotiable for a print-ready file.
Pick something that matches your brand’s energy: clean and minimal, bold and colorful, or elegant and textured. You are not married to it, just use it as a starting layout.
High-resolution PNG with a transparent background is ideal. Minimum 500px wide for a card-sized element. Never use a screenshot of your logo.
Name, title, company, phone, email, and website are the essentials. Keep font sizes at 8pt minimum for any contact detail.
If using a background color that goes to the edge, make sure it fills the entire canvas including the bleed area. Canva will handle this if you set your canvas size correctly.
Is everything readable? Is the hierarchy clear? Is nothing too close to the edge? Check all four corners especially.
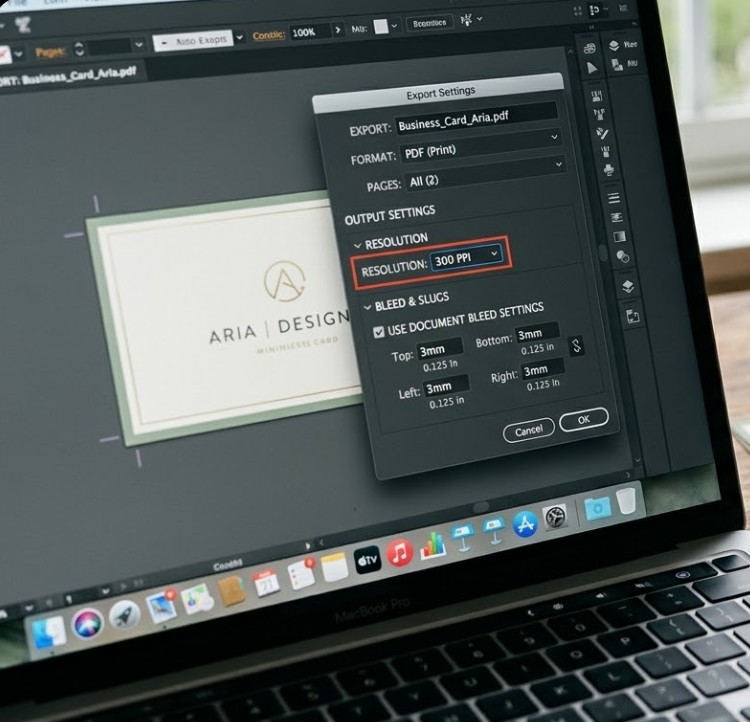
The most important step. PDF Print format, crop marks enabled, bleed enabled. This one setting determines whether your file is print-ready or not.
Exporting for Print: The Settings That Actually Matter
Most people skip the export settings and wonder why their cards look slightly off when printed. Here is the complete export checklist:
| Item | |
|---|---|
| ☐ | Canvas set to 3.75″ x 2.25″ (includes 0.125″ bleed on each side) |
| ☐ | All important text and logos are at least 0.125″ from the final trim edge |
| ☐ | File exported as PDF Print (NOT Standard PDF, JPEG, or PNG) |
| ☐ | Resolution is 300dpi (confirmed in export settings or file info) |
| ☐ | Logo file is crisp and not pixelated at actual print size |
| ☐ | Color mode is CMYK (or noted for printer to convert with your approval) |
| ☐ | Both front AND back designs are included if ordering double-sided cards |
| ☐ | Design reviewed at actual 3.5″ x 2″ print size before sending |
| ☐ | No important content is in the outer 0.125″ bleed margin |
| ☐ | Text is legible at 100% zoom, not just when zoomed in on screen |
Common Digital Tool Mistakes and How to Fix Them
| Mistake | Tool | What Happens | Fix |
|---|---|---|---|
| Using ‘PDF Standard’ instead of ‘PDF Print’ | Canva | File has no bleed, wrong color profile | Always choose PDF Print in Canva download settings |
| Forgetting to check ‘Crop marks and bleed’ | Canva | Background stops at card edge, white border in print | Check this box every time you export for print |
| Designing on RGB artboard in Illustrator | Illustrator | Colors shift when going to press | Set document color mode to CMYK at creation |
| Using embedded web fonts | Various | Fonts may not render correctly in print PDF | Embed or outline all fonts before exporting |
| Exporting as JPEG or PNG | Any tool | Lossy compression, no bleed, wrong color profile | Always export as PDF for print projects |
| Resizing design after completion | Any tool | Elements may scale incorrectly, especially logos | Lock and finalize size before designing, not after |
Even if you design your card in Canva or any other tool, you can upload your file to CheapFastPrinting.com and our team will review it before printing. We check bleed, resolution, color mode, and font embedding, then send you a digital proof showing exactly what your card will look like. All of this is completely free. Think of it as a professional print quality check on your DIY design.
Frequently Asked Questions