Choosing the right placement for hang tags with holes is one of those packaging details that quietly influences how a product is perceived. In the first few seconds a customer sees an item on a rack or shelf, balance, alignment, and logo visibility all work together to form a visual impression. The hole position determines how the tag hangs, twists, overlaps, or stays centered—sometimes making the difference between a polished retail display and a distracting one.
In our experience working with apparel brands, wineries, candle makers, and gift retailers, hole placement is often decided too late in the process or chosen by habit. This guide breaks down left, center, and right hole placements with practical examples, visual logic, and real-world use cases so you can confidently choose what works best for your product—not just what’s common.
What You’ll Learn:
- How hole placement affects balance and hang direction
- Best practices for clothing, bottles, candles, and gifts
- When to use center, corner, or offset holes
- Technical drilling specs and stringing considerations
- Visual layout tips for logos and typography

How Hang Tags With Holes Affect Balance and Presentation
A hang tag doesn’t just carry information—it becomes part of the product’s silhouette. When the hole is placed incorrectly, even a well-designed tag can tilt, flip backward, or cover important packaging details. With hang tags with holes, gravity does most of the talking, and hole placement controls how that gravity behaves.
We’ve tested identical tag designs with different hole positions on the same products. The difference is immediately noticeable: one hangs straight and intentional, another looks accidental. Customers may not consciously identify the issue, but they do register the result.
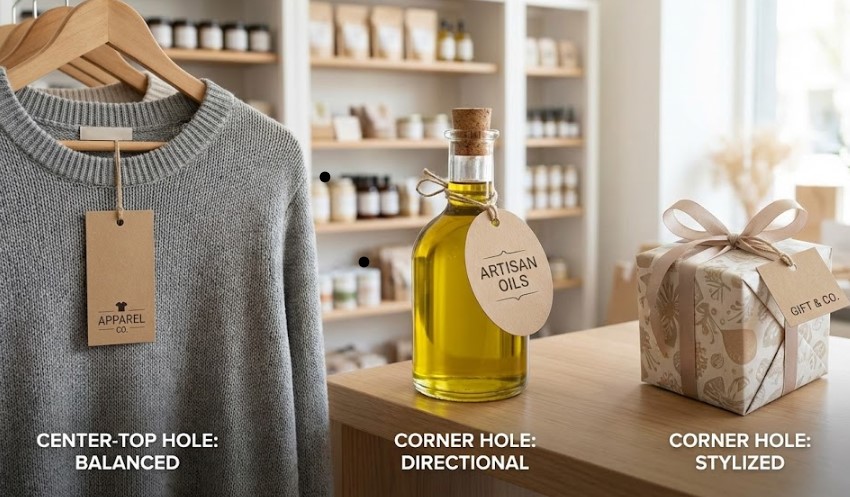
Center Top vs. Corners: Choosing the Right Hole Placement
The most common debate we see revolves around center-top holes versus corner placements. Each has strengths, and neither is universally correct. The decision should be driven by product shape, attachment method, and how the item is displayed in-store.
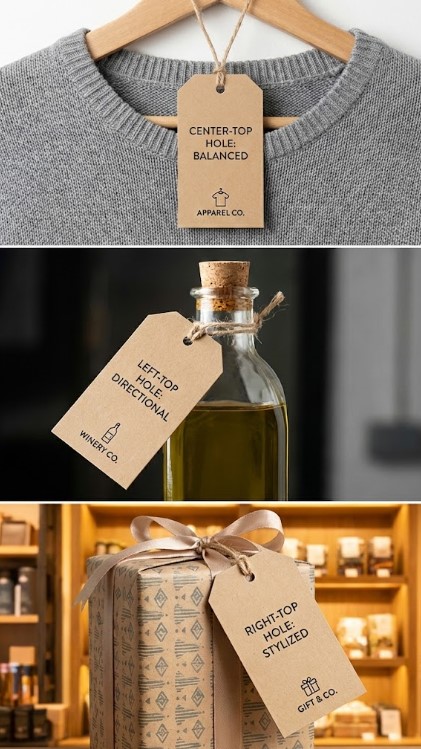
Center-Top Hole Placement (Most Balanced Option)
A centered hole along the top edge is the most neutral and versatile choice for hang tags with holes. It allows the tag to hang symmetrically, making it ideal for products that face forward on racks or shelves.
- Best for apparel on hangers (shirts, jackets, dresses)
- Ideal for boxed goods and retail shelves
- Provides consistent logo visibility
- Reduces unwanted rotation
Center holes are especially effective when the tag design is vertically oriented or when branding elements are aligned along a central axis. If your logo sits dead center, this placement reinforces visual order.
Corner Hole Placement (Directional & Stylized)
Corner holes—usually top-left or top-right—introduce movement and direction. When used intentionally, they can add personality or guide the tag to drape in a specific way.
- Common for bottle neck tags and gift items
- Creates a layered or angled look
- Works well with asymmetrical layouts
- Can reduce tag overlap on clustered products
With hang tags with holes placed in the corner, balance depends heavily on string length and material. Too short, and the tag pulls awkwardly; too long, and it may spin or flip backward.
Product-Specific Recommendations
Clothing: T-Shirts, Jackets, and Dresses
For most apparel, center-top holes are the safest and most professional option. Shirts displayed on hangers benefit from a tag that hangs straight down the center of the garment, avoiding sleeve overlap or twisting.
Sleeve tags, however, often use a slight corner offset. This allows the tag to rest naturally along the sleeve seam without covering the chest area or main graphic.
Bottles & Neck Tags (Wine, Spirits, Oils)
Bottle neck tags are a unique case. The tag isn’t hanging freely—it’s resting against glass. In these situations, hang tags with holes placed slightly off-center or in the corner often perform better.
The goal is to let the tag tilt forward just enough to be readable without slipping behind the bottle. Many wineries intentionally offset the hole to control this angle.
Candles & Jarred Products
For candles, especially those with lids or thick rims, center-top holes provide the most stability. Corner holes can cause the tag to slide to the side and obscure label artwork.
If your candle uses a ribbon or elastic loop, test both placements with the actual packaging before finalizing. Small changes in hole position can dramatically change how the tag rests.
Gift Items & Specialty Packaging
Gift tags often benefit from corner holes because they mimic traditional gift tag aesthetics. This works especially well for seasonal items or limited editions where a casual, handmade feel is desired.
Select Your Product: Hole Placement Suggestion
Choose your product type Clothing on hangers Wine or spirit bottles Candles or jars Gift items
Technical Drilling Specs for Hang Tags With Holes
Beyond placement, hole size matters. The most common drill sizes are 1/8 inch and 3/16 inch, each serving different attachment needs.
- 1/8 inch: Ideal for thin strings, plastic fasteners, and minimal movement
- 3/16 inch: Better for thicker cords, ribbons, or elastic loops
Blueprint-style layouts help ensure consistent drilling, especially for large print runs. We recommend maintaining at least 3/16 inch of paper margin around the hole to prevent tearing.

Stringing Material Impact on Hole Placement
Cotton string, elastic loops, plastic barbs, and satin ribbons all behave differently. Softer materials allow more movement, which can exaggerate poor hole placement. Stiffer fasteners limit movement but require precise alignment.
When testing hang tags with holes, always evaluate the tag attached to the real product—not just hanging freely. The product’s weight and shape change everything.
Logo Visibility and Design Alignment
Hole placement should never be decided without reviewing the tag design. A centered logo paired with a corner hole often feels visually “off,” while an asymmetrical design can shine with offset placement.
We recommend finalizing the artwork first, then choosing the hole position that supports the design hierarchy. With hang tags with holes, alignment is as much about graphic balance as physical balance.
Still unsure which hole placement works best?
In our experience, testing two placements before committing saves time and prevents costly reprints. A small prototype run can reveal issues that aren’t obvious on screen.